

Showing posts with label Children's Books. Show all posts
Showing posts with label Children's Books. Show all posts
Tuesday, July 29, 2014
Thursday, August 25, 2011
Time Turtle!!!

Time Turtle's adventure through...Time!!!
New piece, hopefully for my portfolio. We'll see if it makes the cut.
I'm gearing up for the Northern Ohio SCBWI conference in September and I'm trying to revamp much of my portfolio before then. I'm wicked excited about this conference because it has been about 2 years since I last attended one. It's always really informative and a good time.
Friday, August 19, 2011

Sunday, August 07, 2011
He's gotta be strong and he's gotta be fast...

And he's gotta be fresh from the fight!
Gym Sock!
Hero to all the kids of Squaresville Middle School!
The Raging Cycloptic Janitors of the Fifth Dimension don't stand a chance.
Wednesday, August 03, 2011
It's Beach Time!

I've been hanging on to this one for a while because I just couldn't seem to get the crab right. I think he's looking pretty good now.
Tuesday, June 28, 2011
Mysterious tales of suspense... and mystery!

If you were a kid who was into mystery novels, would you judge this book by its cover and beg your parents to fork over cold hard cash for it?
Mind you, this isn't a real cover to a real novel. Not yet anyway. For now it's just a new portfolio piece that I worked up this week.
I think I'd like to do more book covers. They're a hoot.
Friday, April 15, 2011
Style Test

Fooling around with a sort of old-school style test. It reminds me of brochures I would have seen at the school nurse's office back in the day. "Robbie feels happy because he has high self esteem."
Personally, I think Robbie looks happy because he's walking through the park on a wicked nice day.
I inked it all scribbly with an ultra fine point Sharpie and then colored it in PhotoShop. I've got a book Idea that might lend itself to a style more like this than my usual art style. I might have to do some tests with actual images from said book.
Wednesday, December 29, 2010

Thursday, December 23, 2010

Friday, October 08, 2010
...aaaaaaand scene!


Here's some of my favorite pages from a book I recently finished for super-client Stone Arch Books. It's a tee vee parody. I'll let you guess the show. This project is the one that has been taking up most of my time these last few months, which explains the lack of updates. My intent is to expand my internet presence now that I have some free time. I'll be all over this internet now.
Thursday, August 19, 2010

Saturday, November 14, 2009
This Week In Perpetual Motion 09: Chicken Nugget!

Back on track! For the most part, I'm about a half hour shy of midnight, but it's finished! This week's piece is a mocked up cover for a book concept I had the other day. The title of the book, in case it's hard to read on this low res version is, "Chicken Nugget: The Greatest Dog in the World Ever by Chicken Nugget". Without giving too much of the plot away it's basically the autobiography of a little dog named Chicken Nugget who is so full of himself that he really thinks he's the greatest dog in the world. Judging by the expressions on the faces of the townsfolk, his is not the majority opinion. I don't usually place type on pieces like this but I think the composition would look really odd with out it, as it's kind of central to the whole thing. As always, any crits and comments are welcome.
For the week ahead I plan on continuing sketches and prep work for the next Princess Candy book as well as dive into some much needed self promotion. Hopefully in next week's post I can share what sort of sample packet I'm working on. It's my intent to send a decent package to some publishers that I'd really like to work with. I'll let you know how it all goes down.
For now, it's totally bed time.
Thanks for reading!
Friday, October 30, 2009
This Week in Perpetual Motion 07: Deadline!
Alright, so this is my first Friday since determining that I would post a new, finished piece of work every week with the intent of building my portfolio and keeping this illustration business heading in a forward motion. Did I get the piece done? Sure did, and I'm really pretty happy with it. Check it out:
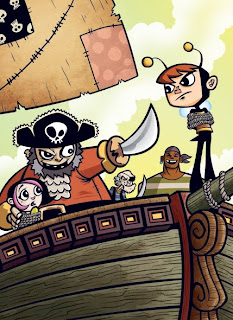
Using my "kid in a bee costume" character again (cooler name forthcoming), I decided I would turn him into something of a young superhero-type starring in his own series of middle-grade graphic or possibly prose novels. That's a market that I think the type of work I like to do fits well in. The above image would be the cover illustration to one of his harrowing adventures. I'm thinking about some black & white images for the interiors that would accompany the text, if the book were to go the prose route.
Process stuff... My process isn't really anything revolutionary but I always like to see this stuff from other artists so perhaps someone may enjoy this part.
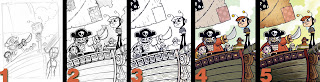
1. Thumbnail - This rough image is about 2.75" x 3.5". I just drew it up quickly one day, thinking about situations to put our hero in. Didn't spend a lot of time on it, just tried to get a sense of the composition.
2. Pencils - I worked at my intended final print size of 6" x 8.25". I would usually work at least a little larger than the print size. These were only supposed to be slightly tighter roughs, which is why I worked smaller, but I kind of got into the drawing and finished them up. I scanned them in at 600 dpi so I could blow it up to the size I would have probably drawn it at when I converted it to a print friendly 300 dpi.
3. Inks - Technically there isn't any ink involved here since I do the line work in Adobe Illustrator. I place the pencils on their own layer and set it to dim the image 50%. Then I start an "inks" layer where I use a combination of the pen tool to trace some of my lines as paths and my Wacom tablet and some customized brushes for stuff like the woodgrain. I'm using it more for the other lines as well, but I'm still learning with it.
4. Flat Colors - After the line work is done I create a layer under the "inks" layer and label it "colors". I do all of the flat color this way, using the pen tool creating shapes. It's probably time consuming to do it this way, but I've been doing this since art school where I was more comfortable with Illustrator and vector art than with PhotoShop. It's weird but I just like to do it this way. Anyhow, you'll see that the color isn't totally flat as I did put some shadows on the figures. Part of the aesthetic that I'm going for is a cell shaded Saturday morning cartoon kind of feel where the somewhat flat characters pop off of a more painted looking background. Which brings us to PhotoShop.
5. Painting and Texture - After I've finished the flat color I export my Illustrator file as PhotoShop document, preserving all the layers. I then open the file up in PhotoShop and start adding textures and painting some shadows and highlights (mostly on the background elements). This piece doesn't have much of that , just some painting on the ship, some texture on the sail. I used a scanned paper texture that I placed over the flats and adjusted levels until I got it where I wanted. I also used the gradient tool in the sky to throw some color variations in there.
That was about it. I'm pleased with the results. If anyone reading this has any comments or critiques please let me know. Feel free to give an honest opinion, I can take it. I'm always looking for ways to improve things and sometimes there can be glaring problems that the artist can't see because they're too close to the piece. So fire away.
Next week I'll hopefully have another new piece. I say hopefully because I'm getting started on paying work, which obviously has to be the priority. I think I can fit something though, so look for that on Friday.
Thanks for stopping by.
Wednesday, October 28, 2009
Sailing Can Be Fun!

Unless, of course, you're our intrepid hero at this particular moment.
Here's a little sneak peak at a work in progress. This is the pencil drawing I did for the piece that I'm going to have finished for Friday.
I hope you love it.
Thanks for looking.
Friday, October 09, 2009
Illustration Friday: Flying

When you're skating really fast, it give you the sensation of flying. Ok, it's a stretch, but maybe these kids just used flying to describe how speedy they were, like, "Man, I was totally flying across the pond! It was wicked!"
That's what I would have said when I was a kid. Actually, I'll say that this winter when I go skating.
Thursday, September 24, 2009
Librarian 4 Hire: Super Sweet Yeti Edition

Finally had the chance to finish up this piece for my children's book, Yeti 4 Hire. (you can see the original drawing here. ) Ok, so it's not an official book yet, but this is one of the samples for the submission packet I'm putting together. I'm still working on the book dummy and tightening up the manuscript, so it will be a while before I get it out the door. I'll just keep making time for it between the paying work.
Tuesday, July 28, 2009
Princess Candy Books available online

The first two Princess Candy titles, Sugar Hero and Marshmallow Mermaid (painstakingly illustrated by me, artfully authored by Michael Dahl) are available on the Stone Arch Books website! If you have a youngster in your life who likes things that are awesome or if you are a kid at heart yourself, head on over there and order six. You can put them in the gift bags at those posh dinner parties you're so fond of throwing. Or just keep some out on your coffee table to show off your intellectual prowess. Whatever the end use, they're the perfect addition to any home, sprucing up libraries and living rooms the world over.
Thursday, July 09, 2009

Tuesday, May 12, 2009
What Dewey Decimal system?

Feared by librarians everywhere, it's our pal Yeti!
Poor guy was just trying to help out and that's the thanks he gets. Sheesh.
Tuesday, May 05, 2009

Subscribe to:
Posts (Atom)